MedeaWiz Sprite and Sprite DMX Interface

I need to control media playback via DMX for my Halloween scene this year. I’m using hardware from MedeaWiz and Fright Ideas, specifically these parts:

Without constraints, these parts have vulnerable electrical connections. I made a carriage to hold the parts and provide standard DMX XLR 3 pin in and out jacks. I printed it in ABS and got some warping, since my 3D printer does not have a heated enclosure. The result is certainly usable though.

I’ve shared the Fusion 360 design, if you’d like to make changes: Sprite Holder
The STL with default export settings is in my 3D print projects Microsoft® Git™ repository: Sprite-Holder.stl

The result is functional, but I’d probably make a few changes to the mechanism for holding the parts if I had infinite time.

Webcam Arm for 3D Printer

Updated 24 Aug 2021 with resolution for OctoPrint “object doesn’t fit print volume” error.

I printed a multi-link arm to hold a Logitech webcam from the 3030 T-slot aluminum extrusion on my Original Prusa i3 MK3S+ 3D printer using the design shared on the Prusa Printers community website. The final result was fine, but finishing this insignificant project was quite frustrating.

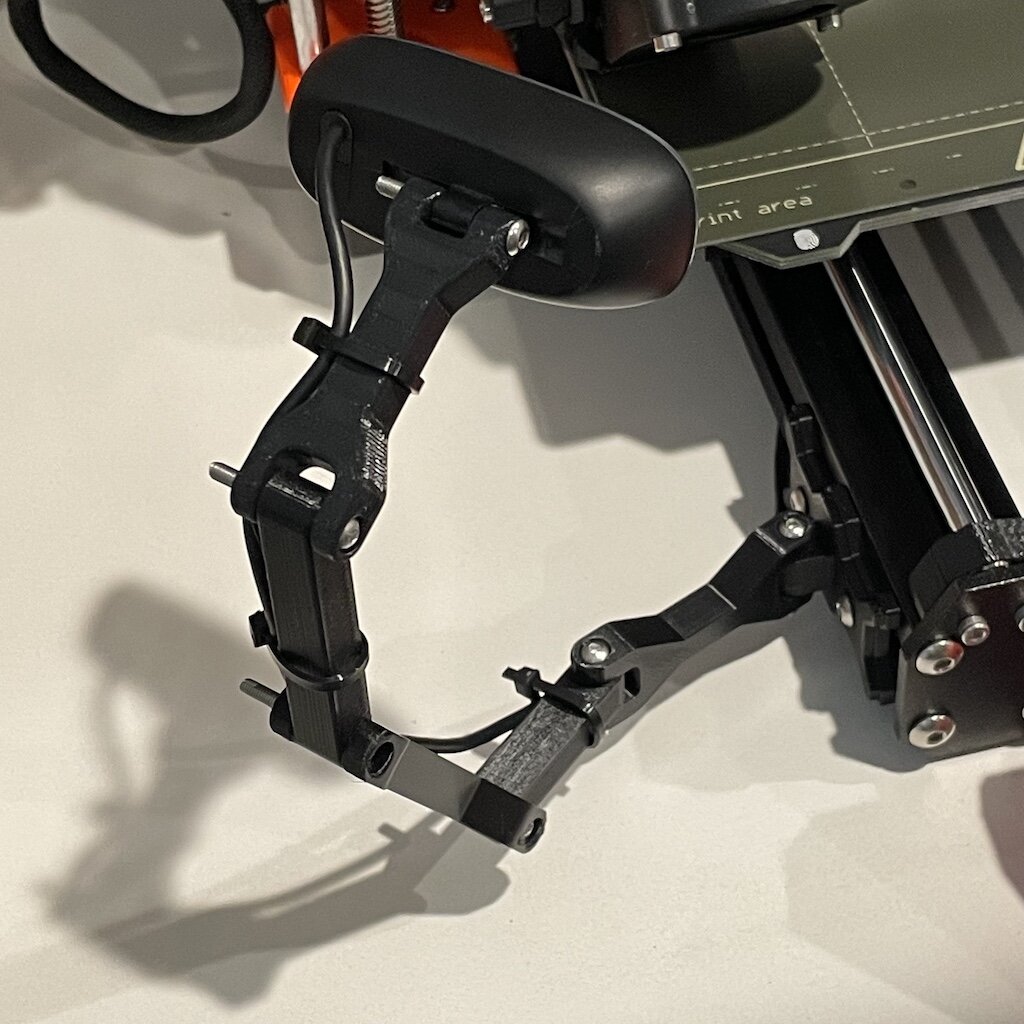
I ordered the nuts and bolts from AliExpress, so it took weeks for them to arrive. I need to build up my inventory of metric hardware. If this had been assembled with drywall screws, I would have had enough materials to build a thousand of ‘em.

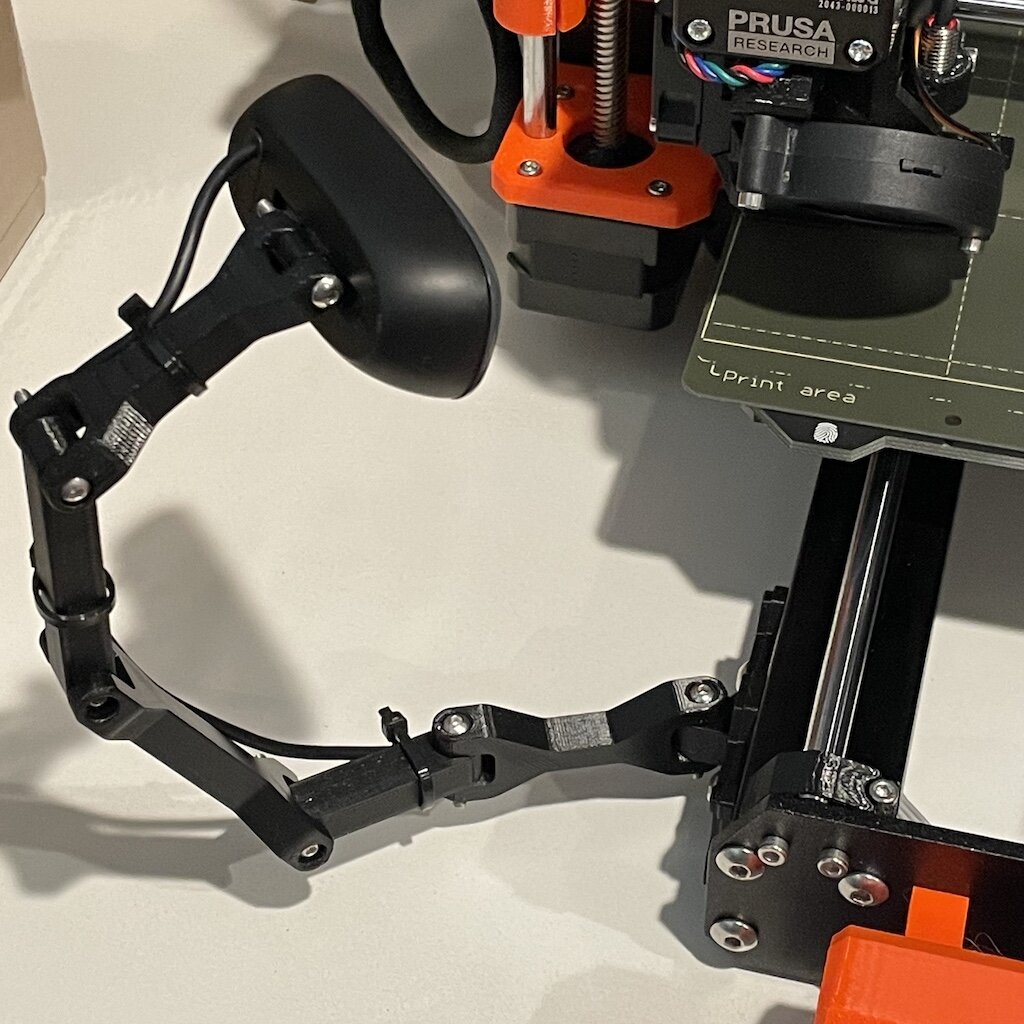
The first print I made was using 0.15 mm layer height, the default for my installation of PrusaSlicer. The resulting parts had poor definition at the through-holes, leading to cracks when tightening the joint. I reprinted the failed part at 0.10 mm and it made a world of difference. I’ll keep this in mind for any future parts that have small details. I considered increasing the infill percentage, but it seems that was not necessary.

I used some M4 T-slot nuts that are too big to be maneuvered into place without opening up the end of the aluminum extrusion. I didn’t realize this when I ordered them. There’s no way I’m disassembling my printer just to add a camera arm. I took them out to the shop and ground them down until I could slip them into the slot. Those nuts only need to hold a few ounces of weight, so I’m not worried about their performance. I might try and get some T-slot nuts that can be twisted into a closed slot for next time.

When making that replacement arm, I downloaded the STL file for just that part. I did the rotate-and-place-on-face thing to make the part printable without supports. For some reason, the resulting G-code file indicated that the part should start at 3 mm below the bed and I got warnings when configuring the job. It doesn’t seem like that’s true by visually inspecting the layers in the slicer. There’s probably a setting I don’t understand or a default I need to change. I tried flipping the part every which way and it perhaps that made a difference. Anyway, the part came out perfectly (with the decreased layer height this time) and looks beautiful.

Update
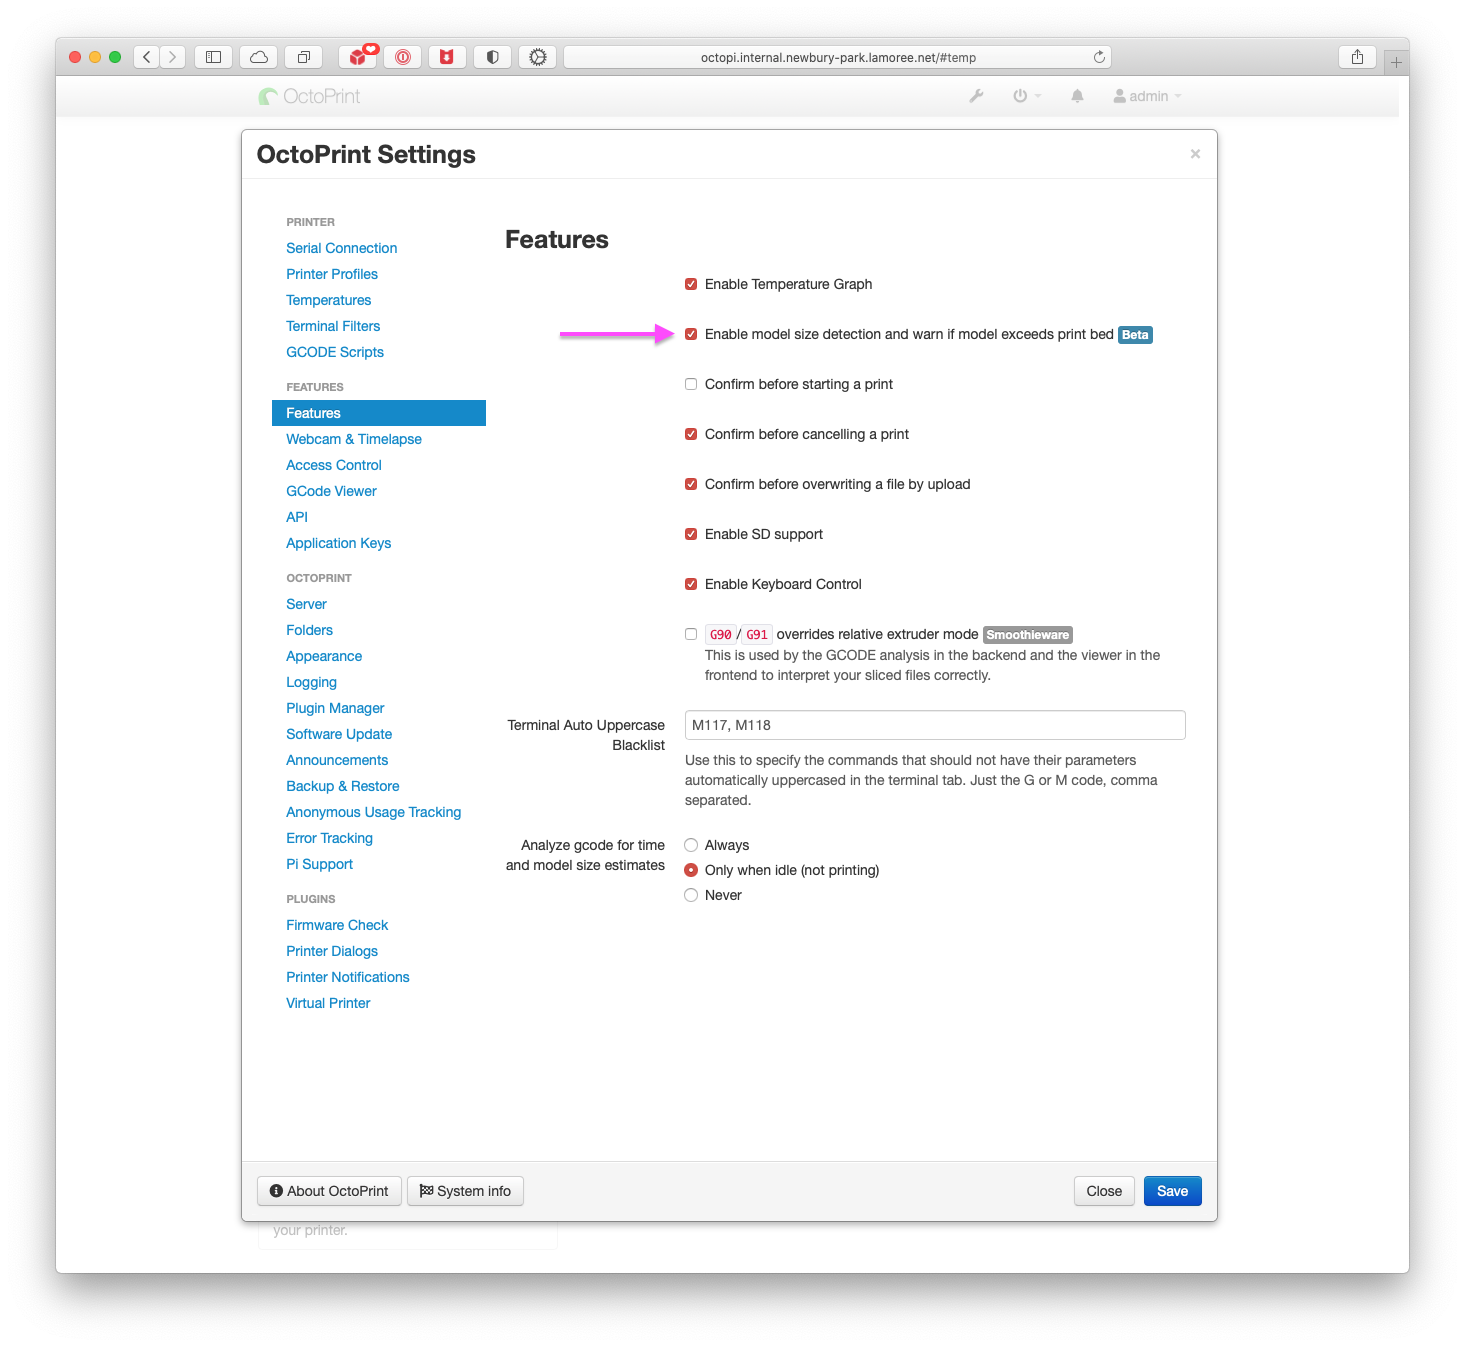
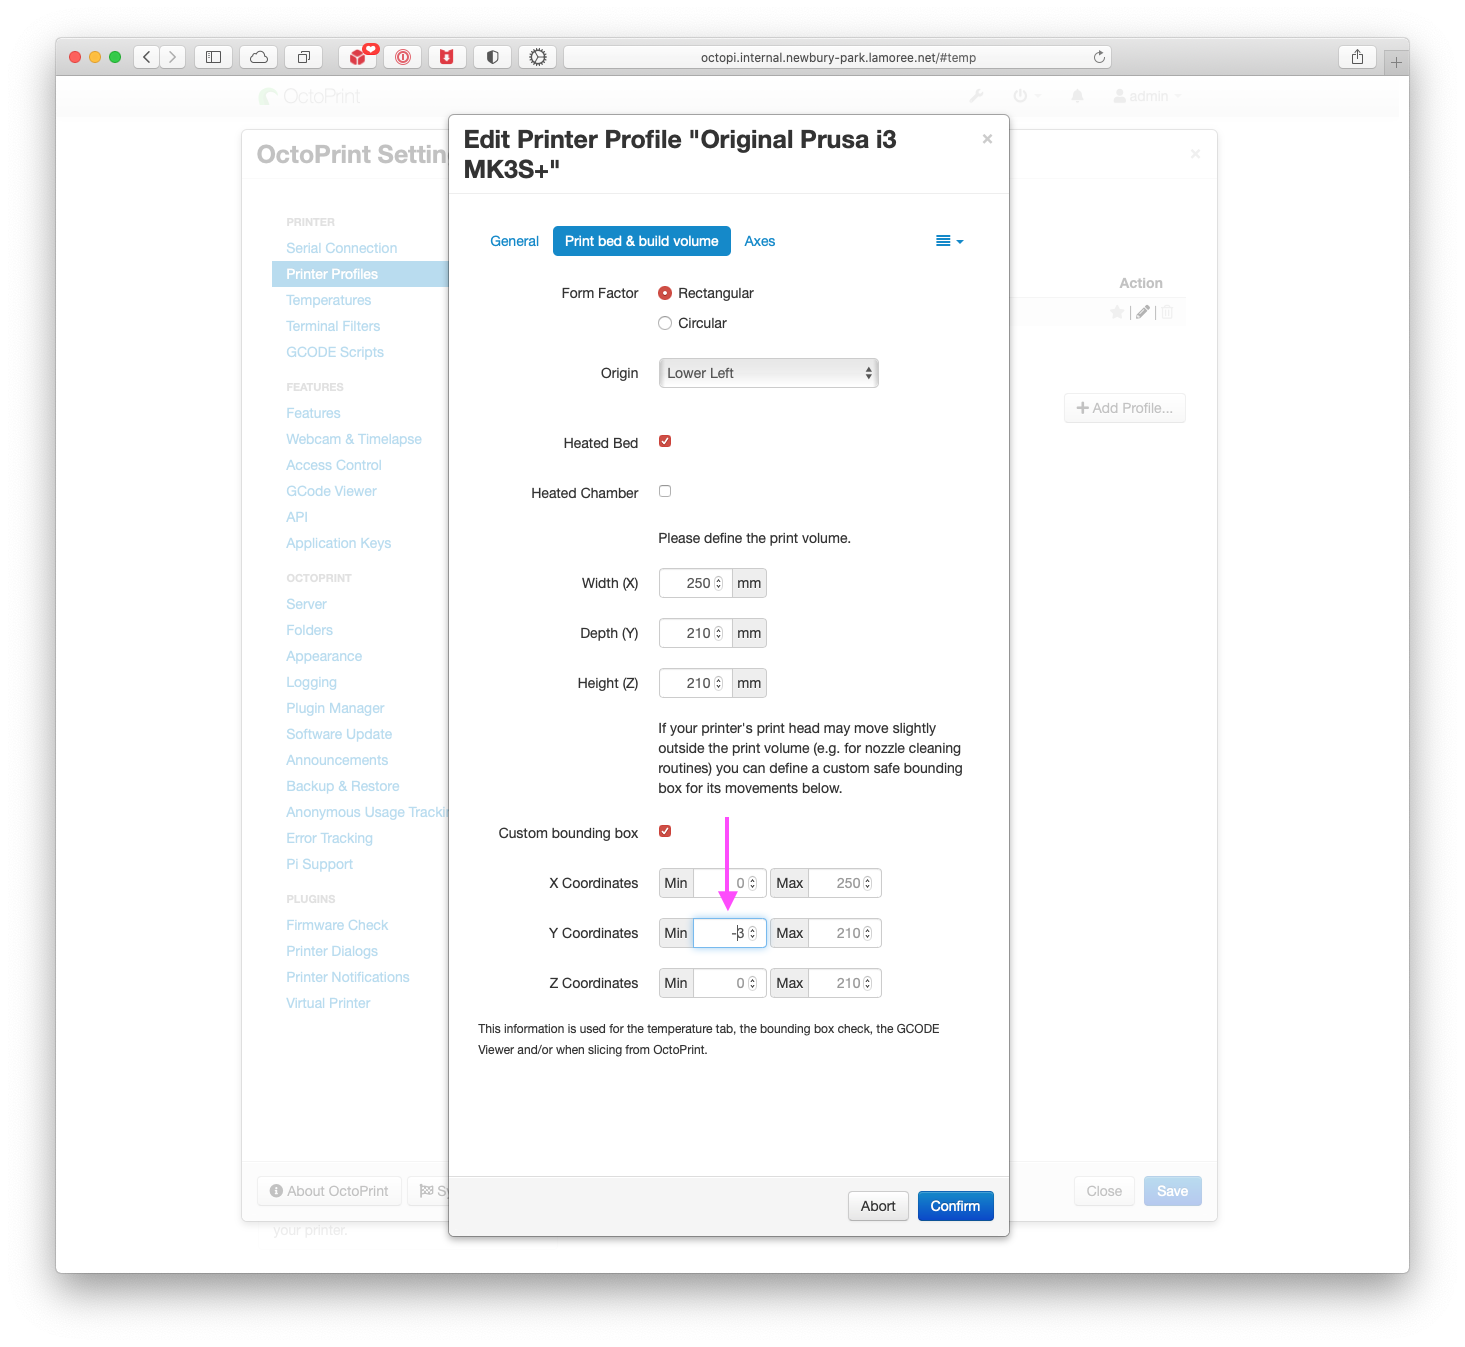
So, it turns out that the job didn’t include instructions to print below the bed surface. The problem is that the PrusaSlicer has extruder priming instructions that are outside the declared print area. Apparently, this can be resolved with a custom bounding box. The recommended resolution is to create a custom bounding box:

The camera arm is done and works great to hold the webcam in the right place so I can monitor jobs with OctoPrint. Now I need to make a ring light for it so I can leave the printer running in the dark office. And a better webcam. The old Logitech 720p webcam is not up to the task.

My Tubeless Tire Air Contraption

I was recently frustrated when mounting a pair of tubeless tires. I couldn’t get a good seal on the valve stem and air was rushing between the bead and rim, never getting close to seating. I wanted to buy a tool to make this job easier, but couldn't find one that met my criteria. I foolishly decided to assemble my own from parts.

Here are my design constraints:

  • The air delivery system can be operated with one hand, leaving the other to grip the tire to assist the bead to properly seat

  • The maximum air pressure is limited so tires aren’t exploded

  • The mechanism seals well to a Presta valve stem with the valve core removed

This is what I came up with:

Assembled contraption

Assembled contraption

Here are the parts I used:

Total parts cost is $121.85 without tax.

Is this a ridiculous amount of money for an air filler? Yes, it is.

Does it achieve all the design goals? Nope. It does not.

Does it work? Yeah, it actually does. Here’s a video show it in use (please accept my apologies):